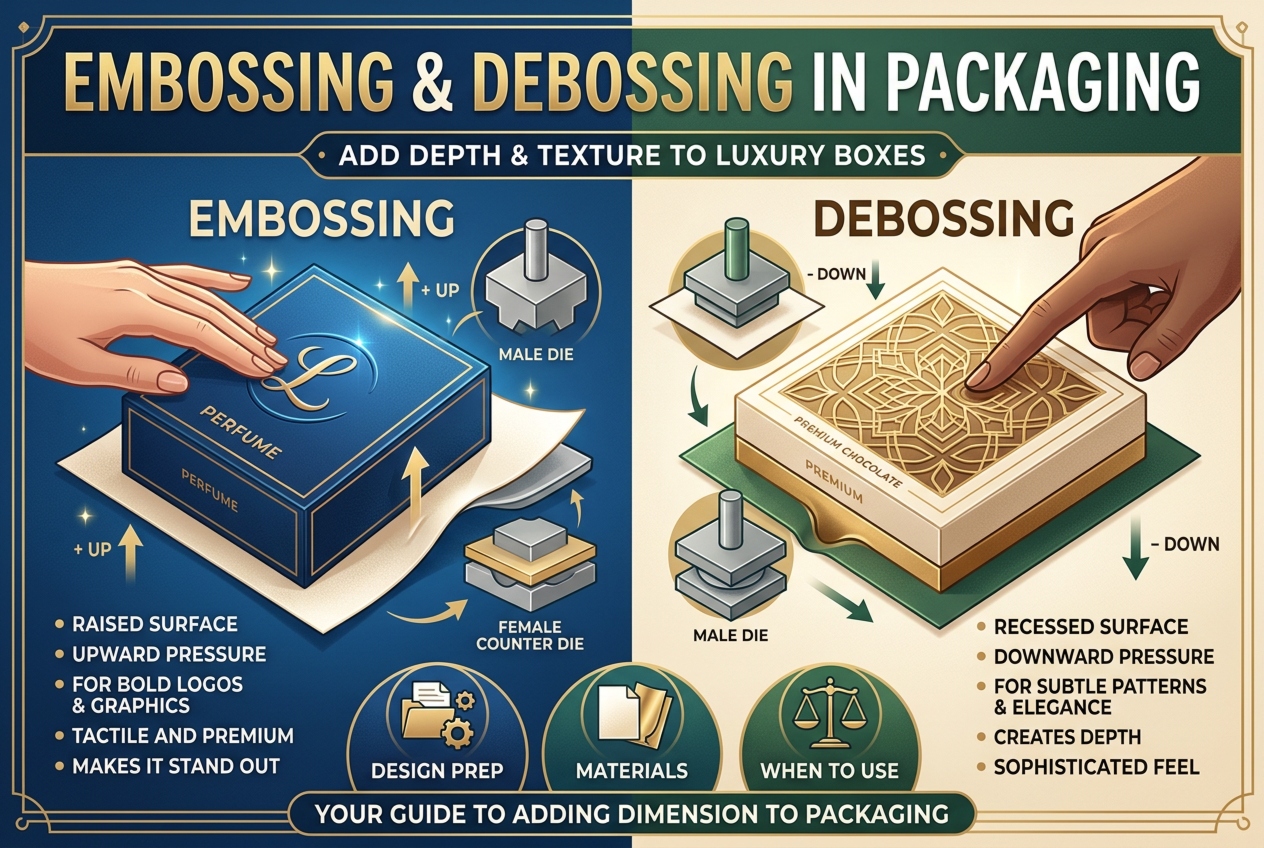
Run your fingers across a luxury perfume box. Feel that raised logo? That is embossing. Notice the pressed-in pattern on a premium chocolate box? That is debossing.
Both techniques turn flat packaging into something people want to touch. They add depth. They add texture. They make your box feel expensive before anyone sees the product inside.
This guide covers everything you need to know. You will learn how each process works, what dies and materials to use, how to prepare your design files, and how to choose the right technique for your packaging project.
What Is Embossing in Packaging?
Embossing is a finishing technique that raises a design above the surface of your packaging material.
It uses two custom metal dies — a male die and a female die. The material sits between them. A machine applies heat and pressure. The male die pushes the material upward into the female die. The result is a three-dimensional pattern that sticks out from the surface.
You can emboss logos, brand names, patterns, icons, or decorative borders. The raised area catches light differently than the flat surface around it. This creates visual contrast and a tactile effect that invites people to touch the box.
Embossing works on paper, cardboard, paperboard, leather, and even some fabrics. It is one of the most widely used premium finishing techniques in the packaging industry.
What Is Debossing in Packaging?
Debossing is the opposite of embossing. Instead of raising the design, it pushes the design into the material.
A metal die presses down on the front surface. This creates a recessed impression — a valley in the material rather than a hill. The design sits below the surrounding surface.
Light grazes across the indentation rather than bouncing off a raised edge. This gives debossing a softer, quieter, and more refined character. Many luxury brands prefer debossing because it communicates elegance through restraint.
Debossing works especially well for logos, monograms, background textures, and minimalist branding. It pairs beautifully with thick rigid boxes, book covers, and high-end cosmetic packaging.
How Embossing and Debossing Work: The Production Process Step by Step
Both processes follow a similar workflow. The difference is the direction of pressure.
Step 1 — Design the artwork. Your graphic designer creates the emboss or deboss layout. All elements must be in vector format. This keeps lines clean at any scale.
Step 2 — Create the die. A specialized manufacturer produces a custom metal die based on your design. The die material depends on complexity and budget.
Step 3 — Set up the press. The die is mounted on the press. For embossing, the male die sits below the material and the female die sits above. For debossing, the die presses down from the top.
Step 4 — Apply heat and pressure. The machine presses the dies together with the packaging material in between. Heat softens the fibers. Pressure reshapes them permanently.
Step 5 — Cool and inspect. The material cools and holds its new shape. Quality checks confirm the depth, alignment, and clarity of every impression before mass production begins.
Embossing happens after printing, varnishing, and laminating. It is a separate press run. This adds time and cost, but the result is worth it.
Types of Embossing and Debossing Dies
The die is the heart of the process. Different die types create different effects.
Single-Level Die changes the surface at one uniform depth. It is the most common and most affordable option. Works great for simple logos and clean shapes.
Multi-Level Die features several layers of depth within the same design. Foreground elements sit higher. Background elements sit lower. This creates a more dynamic, layered look.
Bevel-Edge Die adds a 30 to 60 degree angle on the edges of the design. Deeper impressions need beveled edges to prevent the die from cutting through the material.
Chisel Die has a V-shaped or “roof” profile. It is commonly used for debossing. The result looks sharp and engraved — ideal for typography and fine lines.
Textured Die is a single-level die with an etched surface pattern. It adds grain, weave, or other textures to the embossed area. Best for backgrounds and large surfaces where fine detail is not critical.
Rounded Die produces designs with smooth, curved corners. Logos and typographic elements often look better with rounded edges than sharp ones.
Sculptured Die is the most expensive option. A craftsman hand-sculpts the die from a reference image to create a highly realistic, three-dimensional impression. This is reserved for hero products and flagship packaging lines where maximum visual impact justifies the cost.
Die Materials: Magnesium, Copper, and Brass
The metal used for your die affects cost, detail, and lifespan.
Magnesium is the cheapest and softest option. It works for single-level dies and short production runs. However, it wears out faster and is prone to damage if the press jams. Use it for simple designs and smaller orders.
Copper is stronger and more durable than magnesium. It is also limited to single-level dies but holds up better over longer runs. A solid middle-ground choice.
Brass is the hardest and most expensive die metal. It is required for multi-level and sculptured dies. Brass dies last a very long time and maintain sharp detail even after thousands of impressions. Expect to pay two to three times more than copper. Most die manufacturers will store your brass die for future orders, so you only pay for it once.
Styles of Embossing and Debossing for Packaging Boxes
Beyond the die type, you can choose different finishing styles. Each style changes how the embossed or debossed area looks.
Blind Embossing / Blind Debossing uses no ink or foil. The impression alone creates the effect. This is the most subtle and minimalist option. It works by relying entirely on light, shadow, and texture.
Registered Embossing aligns the embossed area precisely with a printed design underneath. Ink or foil is already on the surface. The embossing adds dimension on top of the existing print. The two must match perfectly.
Foil Embossing / Foil Debossing applies metallic foil at the same time as the embossing or debossing. Gold, silver, copper, and holographic foils are popular choices. The foil fills the raised or recessed area with a reflective, shiny finish. This is one of the most eye-catching combinations in premium packaging.
Combination Embossing merges foil stamping with blind embossing in a single press run. A sculptured brass die is typically used. The process requires tight registration to keep the foil and the impression aligned.
Glazing applies heat under pressure to create a polished, shiny appearance in the embossed area. Dark, heavy-weight stocks work best because the polished effect shows more clearly on darker colors.
Pastelling (Tint Leaf Embossing) uses a combination die with pearl, clear gloss, or pastel-colored foil to produce a soft, two-tone antique look. It gives the design a vintage character without scorching the material.
Embossing vs. Debossing: Key Differences Compared
Both techniques add depth and texture. But they produce opposite effects.
Visual effect. Embossing creates a raised surface that pops forward. Debossing creates a recessed surface that sinks inward. Embossing is bold. Debossing is subtle.
Die requirements. Embossing always requires a matching pair of dies — male and female. Debossing can sometimes use just a single die pressed into a soft material. This makes debossing simpler to produce in certain situations.
Cost. Embossing is generally more expensive than debossing. The need for two precisely aligned dies adds to the setup cost. Additional finishes like foil increase the price further.
Detail and precision. Debossing handles fine details better. Because the pressure is applied inward, the material compresses cleanly into the die. Small text, thin lines, and intricate patterns come out sharper with debossing. Embossing can cause slight softening or rounding at the edges, especially on detailed designs.
Reverse side impact. Embossing always leaves a visible reversed impression on the back of the material. Depending on coverage, this may make the reverse side unusable. Debossing also affects the back, but with careful paper selection and controlled pressure, the distortion is much less noticeable.
Durability. Debossed designs are pressed below the surface. This protects them from wear and tear during handling and shipping. Embossed designs sit above the surface, making them slightly more vulnerable to scuffing over time.
Best Materials and Substrates for Embossing and Debossing
Material choice directly affects the quality of your results.
For embossing, use paperboard with a minimum thickness of 250 gsm. Ideally, go with 300 gsm or higher — especially for deep or multi-level embossing. Thicker stock holds sharper detail. Thin paper can warp, tear, or lose shape under pressure.
Materials that work well for embossing include coated ivory board, grey-backed duplex board, specialty uncoated stocks, and textured art paper. Rigid boxes are ideal because their multi-layer construction absorbs back pressure and prevents warping.
Debossing tolerates a wider range of materials. Because it pushes the design downward rather than lifting it, you can use thicker and sturdier substrates. Corrugated board, heavy cardstock (216 gsm and above), leather, faux leather, and cloth-covered boards all work well with debossing.
A general rule: embossing performs best on thinner, more pliable materials where the raised effect can be more pronounced. Debossing is better suited to thicker, more rigid materials where the recessed design holds its shape.
How to Combine Embossing and Debossing with Other Finishing Techniques
Embossing and debossing shine on their own. They become even more powerful when combined with other finishes.
Foil stamping is the most popular pairing. Metallic gold, silver, copper, or holographic foil fills the embossed or debossed area. The foil catches light while the dimension adds depth. This combination signals luxury immediately.
Spot UV coating adds a high-gloss, shiny layer to specific areas. When placed over an embossed logo or debossed pattern, it creates a striking contrast between matte and glossy surfaces.
Printed embossing layers the dimensional effect on top of a full-color print. This makes the design pop both visually and physically.
Layering stacks multiple embossing methods on the same piece. For example, a lightly embossed background texture with a deeper foil-embossed logo on top. This creates a sculptural, multi-dimensional effect.
Thermography combined with embossing produces a raised, glossy text effect with extra tactile depth underneath. It is a premium combination often seen on high-end stationery and invitation packaging.
You can also use embossing and debossing on the same box. Emboss the logo to make it stand out. Deboss a subtle pattern into the background. This layered approach creates visual hierarchy and a rich, complex surface.
How to Prepare Design Files for Embossing and Debossing
File preparation is where many projects go wrong. Get this right, and your finished packaging will look exactly as intended.
Use vector graphics. Always. Vector files (AI, PDF, EPS) stay clean and sharp at any scale. Bitmap images pixelate and produce jagged edges on the die.
Create separate layers. In Adobe Illustrator, put your emboss and deboss elements on dedicated layers — separate from your regular print artwork. Label them clearly.
Use spot color swatches. Name your swatches exactly: “Emboss” for embossing, “Deboss” for debossing. If you are adding foil, create a swatch named “Foil.” This tells the production team exactly what goes where.
Submit two files. The first file is your full-color printed design. The second file shows only the emboss or deboss areas in solid black on a white background. Both files must be exactly the same size and perfectly aligned.
Respect minimum dimensions. Embossing and debossing artwork needs to be at least 2 mm thick. Maintain at least 1 mm spacing between elements. If lines are thinner or spacing is tighter, “plugging” happens — the artwork clumps together into a solid, unreadable shape.
Stay away from edges and folds. Keep all embossed or debossed elements at least 4 mm away from any fold line, crease, or trim edge. Placing them too close causes wrinkles and distortion during production.
Convert all fonts to outlines. Go to Type → Create Outlines in Illustrator. This turns your text into vector shapes and eliminates any font-related issues at the printer.
Design Tips and Common Mistakes to Avoid
Good embossing and debossing starts with smart design decisions.
Keep it simple. Bold shapes, clean lines, and clear logos emboss and deboss beautifully. Intricate details with thin lines and tiny text do not translate well — especially with embossing.
Choose the right technique for the design. If your design has fine lines, small text, or delicate patterns, debossing will reproduce them more clearly. Save embossing for larger, bolder elements.
Do not overdo it. Embossing every surface of your box does not make it look more premium. It makes it look busy. Pick one or two focal areas — the logo, the brand name, a border — and let the rest of the box breathe.
Watch out for the reverse side. Embossing creates a visible indent on the back of the material. If your box has printing on both sides, plan your layout so the reverse impression does not interfere with the back design. Laminating the inside can help hide this.
Test your material first. Not every paper stock responds the same way to pressure. Request a sample proof before full production. Yes, it costs extra because a custom die must be made. But it is far cheaper than reprinting an entire order.
Use multi-level embossing on larger areas. Multi-level dies look stunning, but they add complexity. On small areas, too much depth increases the risk of tearing. Reserve this technique for larger design elements.
Communicate with your supplier early. Discuss the depth, die type, material, and finish combinations before finalizing your design. An experienced packaging partner will catch potential issues before they become expensive problems.
Cost Factors for Embossing and Debossing Packaging Boxes
Understanding the cost structure helps you plan your budget and make smart decisions.
Die creation is a one-time fee. This is your biggest upfront cost. The price depends on the die material (magnesium, copper, or brass), the complexity of the design, and the number of levels. Sculptured brass dies are the most expensive. Simple single-level magnesium dies are the cheapest.
Per-unit cost drops on longer runs. The die setup cost is fixed regardless of quantity. Once the die is made, each additional unit costs relatively little. This means embossing and debossing become much more cost-effective at higher volumes.
Embossing is usually more expensive than debossing. Embossing requires a matching pair of dies. Debossing can sometimes work with a single die. The extra die adds material cost and requires precise alignment during setup.
Finish combinations increase the price. Adding foil stamping, spot UV, or multiple emboss areas on the same box means more dies, more setup time, and more press runs. Each additional finish adds cost — but also adds perceived value.
Material thickness matters. Harder or thicker materials require more pressure and may need stronger (more expensive) dies. Factor this into your material selection.
Design complexity is the biggest variable. A simple single-level logo emboss costs far less than a multi-level sculptured illustration. The number of embossed areas, the size of each area, and the intricacy of the design all affect the final price. Price is more influenced by die complexity than by whether you choose embossing or debossing.
Industry Applications: Which Packaging Benefits Most?
Embossing and debossing work across almost every product category. Some industries use them more than others.
Cosmetics and skincare. Perfume boxes, skincare cartons, and makeup packaging frequently feature embossed logos or debossed patterns. These techniques reinforce the elegance and premium quality that beauty brands need to project.
Food and beverage. Artisanal chocolate boxes, premium tea packaging, wine labels, and gourmet gift boxes all benefit from embossing and debossing. Metallic foil embossing on a minimalist background is a popular combination for luxury food brands.
Jewelry and watches. High-end jewelry boxes and watch cases use embossing and debossing to convey craftsmanship and exclusivity. The tactile depth makes the unboxing experience feel as special as the product itself.
Electronics. Premium gadget packaging uses embossed or debossed elements to communicate innovation and quality. A subtle debossed logo on a rigid box signals that the brand cares about every detail.
Cannabis. As the industry matures, brands use embossing to add a high-end feel to packaging that might otherwise look generic. It helps differentiate products in a crowded market.
Stationery and books. Journals, notebooks, hardcover books, and premium stationery regularly use debossing on textured papers and leatherette covers. The technique creates a sophisticated, lasting impression.
Gift boxes and seasonal packaging. Embossed or debossed gift boxes stand out during holidays and special occasions. Stock folding cartons with decorative embossing are available for seasonal campaigns and promotional runs.
How Embossing and Debossing Enhance Brand Perception
These techniques do more than decorate a box. They change how people feel about your brand.
Touch drives memory. Texture invites people to pick up your box and feel it. Tactile interaction with packaging increases product recall and purchase intent. An embossed or debossed surface turns a simple box into a multisensory experience.
Dimension signals quality. A raised logo or a pressed-in pattern tells customers the brand invested in its packaging. It communicates that the product inside is worth the extra effort. This perceived premium quality justifies higher price points.
Scarcity stands out. Most packaging on a shelf is flat. Embossing and debossing are less common than standard printing. When your box has physical depth, it signals exclusivity. Customers notice what is different.
The unboxing experience gets better. Consumers increasingly share unboxing moments on social media. Packaging with visible texture and dimension photographs well and feels impressive on camera. It turns your box into a marketing asset.
Brand loyalty grows. When customers associate your brand with a high-quality tactile experience, they are more likely to remember you and buy again. Every embossed or debossed box reinforces that association.
Sustainability Considerations for Embossed and Debossed Packaging
Sustainability matters. The good news is that embossing and debossing are compatible with eco-friendly packaging strategies.
Blind embossing and debossing use no ink or foil. The effect comes entirely from reshaping the material. No additional chemicals, coatings, or layers are needed. This makes blind embossing one of the cleanest premium finishing techniques available.
Recycled paperboard works. Many recycled and FSC-certified substrates can be successfully embossed or debossed. The key is that the fiber structure and thickness must support the required pressure and depth. Discuss your material options with your supplier.
Replace excessive printing with texture. Instead of covering your box in heavy ink coverage, use embossing or debossing to create visual interest. This reduces chemical usage while still delivering a premium look.
The trend is growing. More brands are combining sustainable materials with embossing and debossing to create packaging that is both eco-conscious and luxurious. Clean design with strategic texture is replacing overprinted, plastic-coated packaging.
How to Choose Between Embossing and Debossing for Your Packaging
There is no universal answer. The right choice depends on your brand, your product, and your goals.
Choose embossing when you want bold visual impact. Embossing grabs attention on crowded shelves. It works best for logos, headlines, and design elements that need to stand out from a distance. It is ideal for retail packaging, gift boxes, and any product where shelf presence matters.
Choose debossing when you want understated elegance. Debossing communicates sophistication through subtlety. It works beautifully on luxury boxes, corporate packaging, leather-covered items, and minimalist designs. It is perfect for products where the customer holds the box in their hands.
Consider your budget. Debossing is generally more economical because it can require fewer dies. If cost is a primary concern and the design supports it, debossing offers a premium feel at a lower price point.
Match the material. Thinner, more flexible substrates favor embossing. Thicker, more rigid substrates favor debossing. Your material should support whichever technique you choose without warping or tearing.
Think about combinations. You do not have to choose just one. Many high-end packaging designs use both techniques together. Emboss the logo. Deboss a background pattern. Add foil stamping for contrast. The combination creates depth and hierarchy that a single technique cannot achieve alone.
Talk to your packaging supplier. Share your design, your budget, and your goals. An experienced partner will recommend the best technique — or combination of techniques — for your specific project. Request samples before committing to a full production run.
Frequently Asked Questions
Can I use embossing and debossing on the same box?
Yes. Many premium packaging designs combine both techniques. You might emboss a logo on the lid and deboss a pattern on the sides. This creates contrast and visual interest.
Will embossing or debossing damage the printing on my box?
No, when done correctly. These techniques are applied after printing. However, you need to ensure proper alignment between the printed design and the emboss or deboss die.
What is the minimum order quantity for embossed or debossed packaging?
It varies by supplier. Many manufacturers set a minimum of 100 to 500 units for offset-printed orders with special finishes. The die setup cost is fixed, so higher quantities bring the per-unit cost down significantly.
Can I emboss or deboss corrugated boxes?
Yes, but with limitations. Corrugated material is thick and rigid. Simple designs work well. Intricate details or deep multi-level embossing may not produce clean results on corrugated board.
Can my die be reused for future orders?
Yes. Most suppliers store your die after production. You can reuse it on future orders without paying for die creation again. Brass dies in particular last for many years and thousands of impressions.
Does embossing or debossing work on eco-friendly materials?
Yes. Many recycled and certified paperboards support embossing and debossing. The material must have enough thickness and fiber strength to handle the pressure. Your supplier can recommend the best sustainable substrates for your project.
Embossing and debossing transform ordinary packaging into something people want to pick up, feel, and remember. Whether you choose a bold raised logo or a subtle pressed-in pattern, these techniques add a dimension that flat printing simply cannot achieve. The right combination of die type, material, and finishing style will make your packaging work harder for your brand — on the shelf, in the customer’s hands, and long after the unboxing is over.